
How to configure an automated test run with TFS 2010 and Test Manager
Some of you may have read my earlier post on the associated automation in TFS and Test Manager here. I got some comments that made me realize that more people could benefit from a complete step by step guide on this subject. As such this post will be very long but with a lot of pictures so I hope you stick with me.
Environment
First of all you’ll need a TFS environment, I downloaded my environment from Brian Keller here and all the screenshots you’ll see will be from Brian’s image.
Test Controller
You’ll need to start a Test Controller and register team project collection controller like so:

Configuring an automated Test Environment
To be able to run automated test runs we need to configure an automated test environment first. Startup your Test Manager and change to the Lab Center by clicking on the dropdown:

In the Lab Center click on the Controllers tab marked in red:

Make sure that your Test Controller shows up and has the status Ready:

Next step is to return to the Lab Tab marked in red and configure an Environment:

On the New dropdown choose “New physical environment” like such:

Give your Environment a good name following your specific naming conventions and make sure that the Controller is correctly assigned. Click the button “Next” when you’re ready.

On the “Machines” page click on your controller and then click on the button “Add to environment” marked in red.

As you do that your machine will appear on the left side of the screen. To continue you need to give the machine a specific role to make it easier for people to understand the role of the machine. I gave the machine the “Server” role like the picture below. When you’re ready should be able to click the next button.

On the “Machine Properties” page you could fill in more details regarding your machine but I simply skipped this step for now and left it clean.

On the summary page I just clicked the Finished button and got on with next step.

When you’re finished make sure you see a green ready symbol like so:

Now we need to configure our automated test settings by clicking on the “Test Settings” tab marked in red below:

Click the “New” button to create the automated test settings:

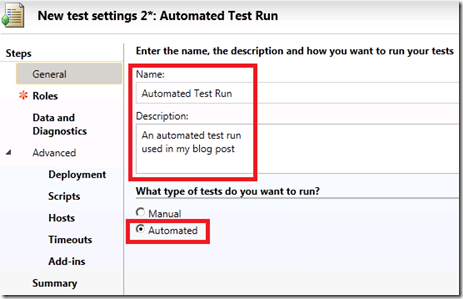
Give the test settings a name, description and make sure that you choose automated in the selection section. Click the “Next” button when you’re finished.
On the Roles page make sure you click the role you choose earlier when you created your environment, for me that would be the “Server” role, otherwise you will not be able to click the “Next” button. 
If you have several roles you’ll need to chose which one you’re going to use for your automated tests, In my case I didn’t need to change this as I have only one role.

Click the “Next” button when you’re done.
On the “Data and Diagnostics” page configure anything you need and click the “Next” button, In my case I left all the defaults and clicked the “Next” button.
On the “Advanced” page you can configure even more advanced configurations, in my case I just clicked the “Next” button until the Summary page appeared.
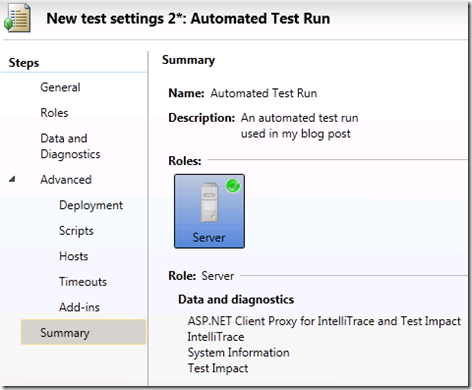
So click the “Finish” button and lets go on with this adventure. Your result should be another entry in your Test Settings list:

Turning the manual test into automated in Testing Center
Lets go back to the Testing Center by clicking the dropdown like so:

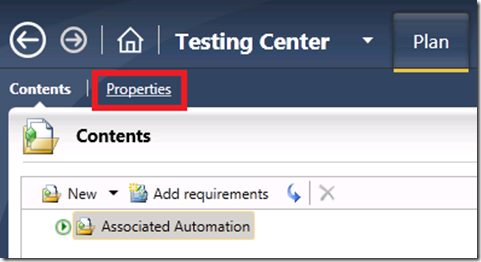
Make sure you’re on the “Plan” tab and click the “Properties” link marked in red below. Here I’m assuming that you already have created a new suite, if you haven’t you should read this post.
On the somewhat huge properties page (you can easily get overwhelmed with all that information but I’ll lead the way) you should make sure that you choose your test settings in the Automated runs section, in my case I chose “Automated Test Run” created earlier.

Next you choose your Test environment, in my case I chose “Automated Test Environment” created earlier.

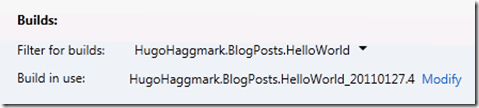
Next you’ll have to assign a build for the automated tests. Assuming that you already created a build in this step otherwise you’ll need to create one. The section you’re looking for should look like so:
That’s it now click the Save and Close button and lets test this baby…
Change to the “Test” tab and start your automated test cases with the “Run” button:

If you’ve done your job right you should see the following very nice summary page:

Hope this will help someone out there with this rather straightforward but long blog post.
Cheers!
Hugo
Comments