
Creating a bootable VHD the easy way
2010-11-15 Script file updated
This blog post has been updated after feedback from my colleagues Markus Ahlstrand and Johan Leino, thanks you guys! The original blog post contained 1 error and needed 2 clarifications and 1 refinement, all updated content is highlighted below.
I’ve worked a lot with SharePoint development during the last 3 years and before SharePoint 2010 you could use Virtual PC to create your development environment. But as you might know a SharePoint 2010 development environment has to be on an x64-bit environment as described in this article “Setting up the Development Environment for SharePoint 2010…”
So this left me with some alternatives:
- Install the bits on your own x64-machine.
- Use another virtualization platform such as Hyper-V, VMWare or VirtualBox that have support for x64 on my own x64-machine.
- Create a bootable VHD from Windows 7.
I chose the bootable VHD option because I love the feel of Windows 7 and the rich features that Windows 7 gives the end user. On the other side I need the flexibility to start my SharePoint 2010 box when I need that with (almost) no performance loss.
There’s a lot of blogs out there that describe how to create a bootable VHD and so I will not list them here but I will give you a nice automated head start (without MB’s of download).
In the linked CreateBootableVHD_v2.zip you will find two files:
- CreateBootableVHD_v2.bat, the batch-file with all the magic :-)
- Install-WindowsImage.ps1, a power shell script from http://code.msdn.microsoft.com/InstallWindowsImage.
Requirements:
- A machine running Windows 7 or Windows Server 2008 R2.
- Windows 7 or Windows Server 2008 R2 installation media or a Windows 7 or Windows Server 2008 R2 .wim image captured from a reference machine.
The following steps are provided with a “works on my box” guarantee.
- Download the linked zip-package.
- Select Properties on the zip-package and click on the Unblock button.
- Extract the zip-package to a folder of your choice.
- For each extracted file select Properties and click on the Unblock button.
- Mount your installation media from an iso file or DVD.
- Look for the file “install.wim” on your installation media (see number 3 above) and remember the path, in my case F:\sources\install.wim.
- Open a PowerShell command prompt with the run as Administrator option. You need to run the attached bat-file from a PowerShell console as an Administrator and not from the usual command prompt. (thanks Johan for pointing out this clarification!)
- Change directory to the directory where you extracted the zip-package.
-
Before I show you how to use the CreateBootableVHD.bat file there is 2 important concepts that you need to know:
- The third parameter in CreateBootableVHD.bat expects you to enter the type of VHD that you want to create. If you choose DYNAMIC EXPANDABLE (thanks Markus for pointing out this error!) you will need to make sure that you have the specified amount of GB left for the VHD even though the VHD will be small at first.
- CreateBootableVHD.bat will assign your bootable VHD a drive letter, it’s very important to use a FREE drive letter.
- When you enter a drive letter make sure you don’t enter a colon after the letter i.e. X and never X:. (thanks Markus for pointing out this clarification!)
- Now you’re ready to use the CreateBootableVHD.bat-file like this:
CreateBootableVHD_v2.bat <path where you like to store the VHD, doesn’t work on external drives> <size in MB> <type FIXED|DYNAMICEXPANDABLE> <drive letter assigned to the VHD> <path to the wim-file, see number 4 above>.
_ Ex: .\CreateBootableVHD_v2.bat C:\VHD\W2k8.vhd 40000 FIXED X F:\sources\install.wim _
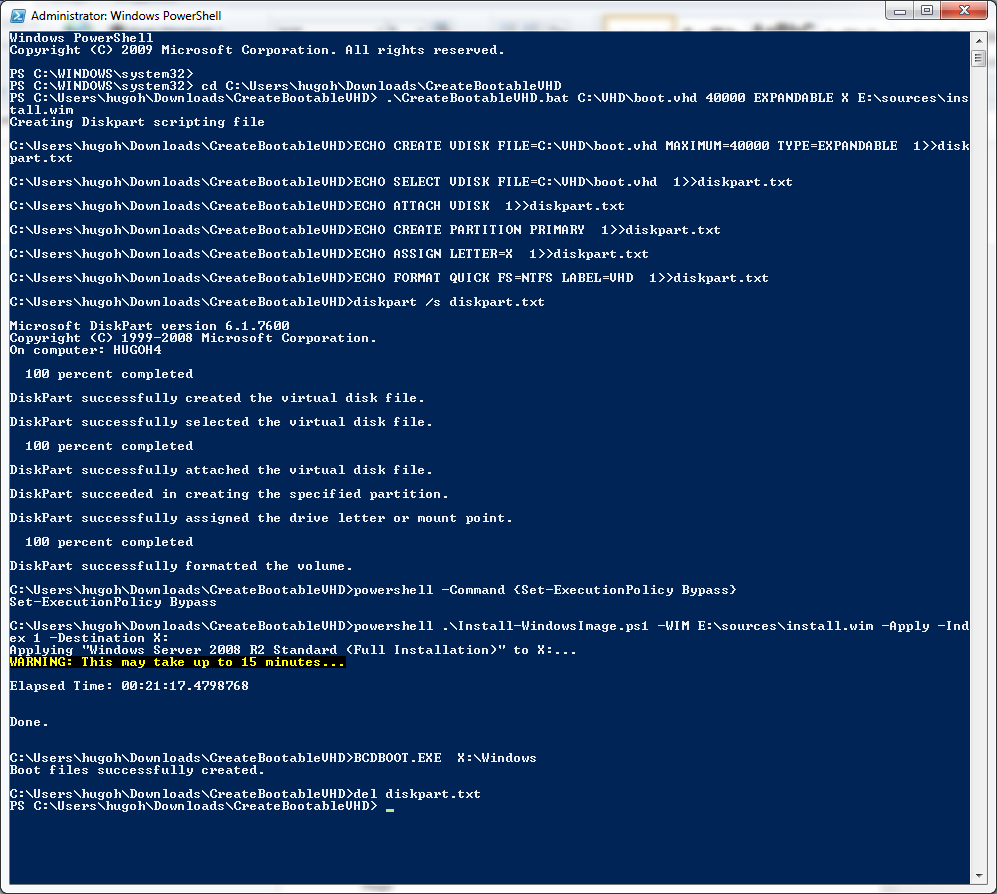
To show an actual example here is a snapshot from my latest run:
After 30-60 minutes depending on the size of the VHD and your hardware you’ll have a new boot option.
Hope you enjoy the script.
Hugo
Comments